


Maria Valéria Bussamara Pinheiro1
The evolution of the digital photography in the last decades has revolutionized the documentation of patients in dermatology.The photographic record has become much more practical and affordable, and today we can say that photography is part of the Dermatologist's routine. In cosmetic dermatology, the photographs enable the analysis of the improvement of the skin with the procedures. In dermatologic surgery, the images are used to document pre-and post-operative as well as intraoperative details (such as marking the operated area and the surgical steps). And the clinical dermatologist uses the photography to observe the evolution of lesions during treatment. However, as we become more intimate of the photographic act itself, some troubles are more easily detected, and sometimes, we need to be creative in order to solve them.
Keywords: PHOTOGRAPHY, DERMATOLOGY, SURGERY, SURGICAL PROCEDURES.
As dermatologists, we are interested in medical photography, as discussed in the first part of the present article, published in this journal (Volume 5,Number 2,April-June 2013). Medical photography is a medium that accurately describes what we see in the patient's skin, and is performed following basic photography techniques and a rigorous standardization of images in order to gather the necessary information for comparing photographs.1
From the moment we decide to use medical photography in a case, we should think in terms of a script to be followed, starting with the preparation of the location where the photographs will be taken through to the preparation of the patient. At each step in the process (even with knowledge of photography techniques) we can still come across a range of problems, such as issues involving physical space, lighting, image composition, and operation of equipment, among others. To generate good quality images, we should note all these details.
In order to compare two photographs-one taken before a procedure, the other taken after it-we must take into account that the only variable factor in the photographs should be in the patient's skin. Parameters, such as exposure (aperture + shutter speed + ISO), the focal length, the ambient lighting, the position of the patient and camera, and the background used in the images, should always be the same and be consistently applied in all photographs.
Exposure
Ambient light can be natural (from a window) or artificial (such as ceiling or wall lighting, or flash), however the correct exposure parameters should always be the same. Recalling that exposure is the balance between the aperture, shutter speed, and ISO, each of these parameters should be adjusted according to the type of lighting present in each environment. Ideally, one should run several tests (using the "manual" mode of the camera) to arrive at the correct exposure. Once the exposure has been determined, it must be applied to all "before and after" photographs of each patient.2 Depending on the photographer's preference, the "automatic" setting of the camera can be used instead, however the process will certainly not be as interesting for the photographer.
Background
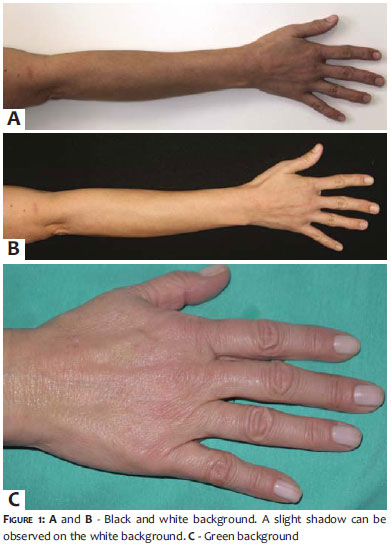
The most cited background colors in scientific papers are black and white, however some shades of blue or green can be used in cases of surgical photographs. Medium gray is considered a neutral tone in photography, and is therefore a good option (Figure 1). The background must be neutral and smooth in order not to distract the observer.3 Furthermore, it must occupy the entire frame of the picture, meaning that the photographed subject should occupy the central area of the image, with the entire surrounding background being filled solely by the chosen color.
The presence of elements that have no relation to the photographed subject can distract the observer. For example, in a full-body photograph an angle lens (wider scope of view) is used, resulting in a significant part of the room also being photographed with all its components (chairs, cabinets, door, etc). A background that spans the entire length of a wall in the room, as well as removing all furniture at the time of the shooting, solves this problem.
Patient Identification
All patients must be clearly identified on the picture. This information will be extremely important when retrieving the images from the photographic archive. Provided that they are small and neutral in color (white, preferably), and do not interfere with the picture, self-adhesive labels can be used. Another alternative is to write all of the patient's data on a blank sheet of paper, photographing it before the first image of the patient is taken.
Preparation of the patient
In regards to framing a shot, the more of the patient (or the body part that is being photographed) that occupies the photograph, the better its quality will be. It is important to bear in mind that the camera's sensor will record the image, and the greater the amount of patient "information" recorded by the sensor, the better the quality of the photograph.
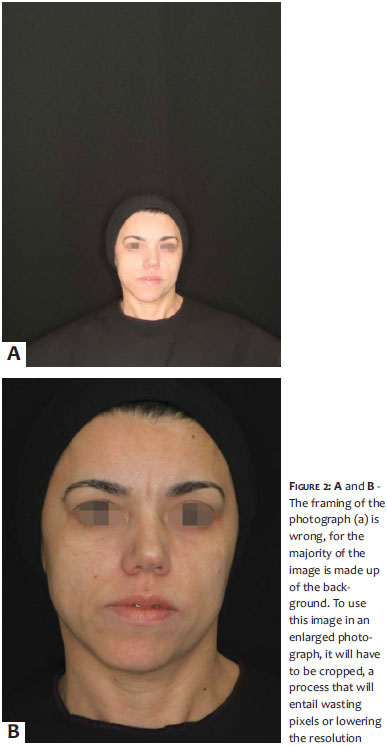
The photographer should frame the photograph in a way that the patient's image almost completely occupies the viewfinder (up to the maximum possible without "cutting" an important part of the body out of the frame) (Figure 2). The remaining areas of the viewfinder must be occupied only by the background-and not by other objects and/or people.
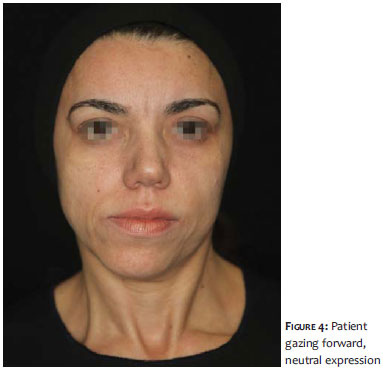
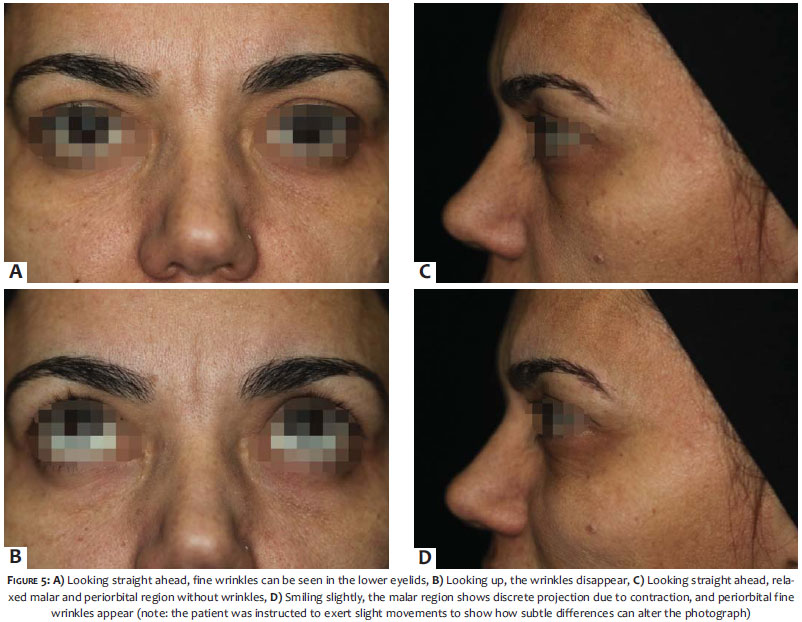
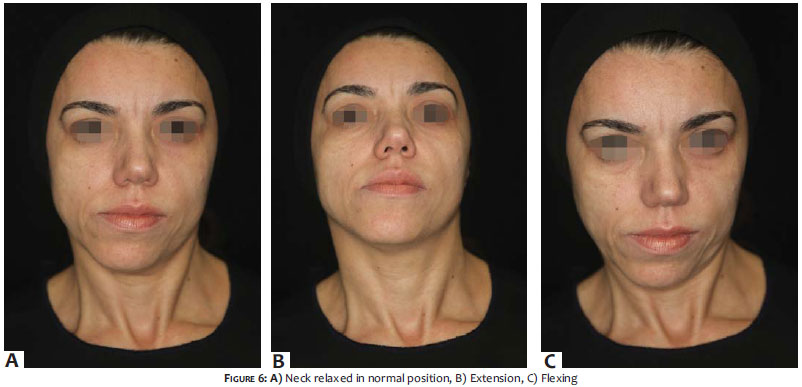
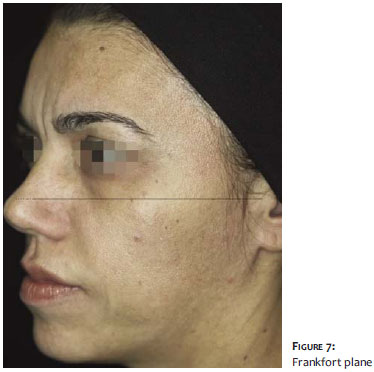
The preparation of the patient comprises eliminating all elements that may distract attention from the subject, such as accessories, makeup, and apparel.4 (Figure 3) Disposable underwear can be used during the shoot and discarded afterwards, and is commercially available. Aprons must be neutral in color, as strong colors may be reflected in the patient's skin. As for the hair, ideally bathing caps should be worn or hair tied back with bands, so that it does not appear in the image. Oil on the patient's skin must be removed in order to avoid any reflection of light.5-11 The patient should be positioned comfortably, preferably sitting with his or her back supported, whenever possible. In this way, any possible body movements resulting from a patient's fatigue at the time of exposure are avoided. The patient's facial expression must be neutral (Figure 4), with the eyes directed forward, as any muscle movement can alter the expression, increasing or reducing wrinkles and palpebral bags, for instance (Figure 5). The head and neck must be in a natural and fixed position (it can be helpful to put a focal point on the opposite wall to help fix the gaze). Flexing and extending the neck may give misleading impressions of the absence or presence of wrinkles and sagging (Figure 6). In the case of full-body photographs, it is important to obtain at least three photographs: one of the entire body, one taken at a medium distance, and one a close-up of the lesions. The more common facial photographic technique uses a Frankfort horizontal plane as a reference 4 (an imaginary line running from the external auditory canal to the infraorbital rim), which is parallel to the floor, preventing the chin from being directed upward or downward (Figure 7). In this case, the face is not totally turned to the side, and is rather at a "diagonal" angle.
When the patient needs to be photographed in the supine position, as many as possible "extra" elements, such as pillows and linens, must be eliminated from the frame. In many cases, a number of shots will be needed to form the complete picture of the patient lying down.
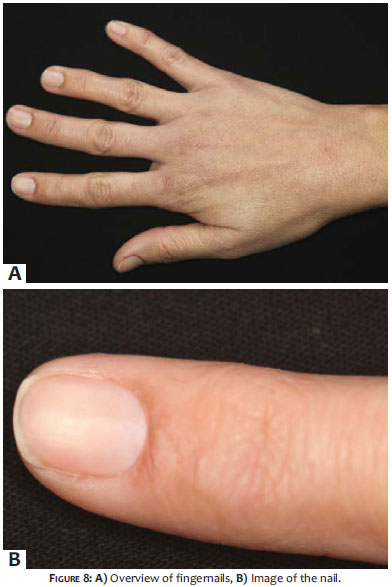
In macro or close-up photography, some means of showing the size of a lesion, such as a placing a ruler next to it, must be used and should always include an identifiable body part. Hands can be photographed together (horizontally) or separated (vertically), with fingers always separated. Feet and legs are more difficult to photograph due to the angle of the ankle, and as a result, the patient's feet should ideally be resting on the background of the image (on the floor), following the same recommendations for the hands, meaning they can be photographed together or apart. A superior diagonal view and a lateral view are also useful. Legs and thighs can be photographed in different positions according to the need and possible options, however they should always rest against the background, with the same position being adopted in subsequent photographs. Photographs of nails should contain an overview of the foot or hand, and the affected nail 6 (Figure 8). Eyelids should be photographed open and closed, and, whenever possible, one of the photographs should be taken very close up in order to allow the measurement of the ocular opening and the distance between the border of the upper eyelid and the beginning of the eyebrow hairs' implantation. This measurement is useful in cases of photographs documenting the post-application period in botulinum toxin administration cases, in order to verify the presence-even if mild-of ptosis prior to the procedure.
The nose should be photographed frontally, laterally (silhouettes), and seen from below. The ears must be photographed in their natural position and then under traction for the visualization of the posterior portion.
The patient's position relative to the doctor is also relevant.7 All photographs must respect the distance between the camera and the patient that was used in the first picture. A useful idea is to mark on the floor the original position of the physician, the patient, and the camera. Another important detail is the physician's perspective: he or she must position himself or herself with the camera in such a way that his or her eyes are level with the patient's, at an angle relative to the floor that does not leave the patient with a "flattened" appearance (photograph taken from the top down) nor "stretched" (taken from the bottom-up). In case the physician is shorter than the patient, the first must sit on a stool; if the opposite occurs (including with children), the patient can sit upon a supporting base. Babies must be lying down and photographs taken from above.
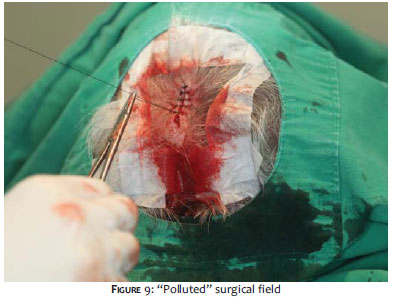
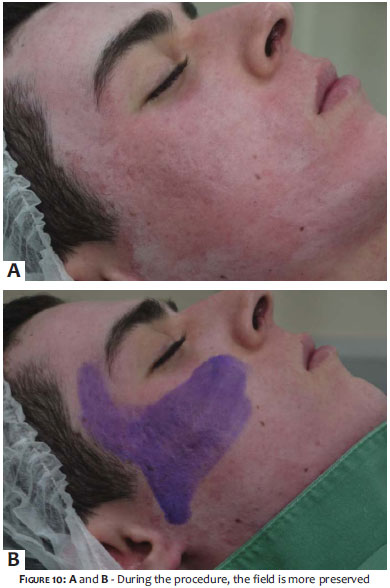
In the case of intraoperative photographs, the entire scene must be cleaned: surgical instruments, blood-soaked gauzes, very soiled gloves, and surgical fields can "pollute" the image and divert attention from the main subject (Figures 9 and 10). When possible, the surgical field can be used as the background, with the surgeon or other parts of the operating room arranged so that they do not appear in the photograph. In order to avoid contamination of the scene by getting too close to the operative field, zoom lenses are preferred. Ideally, the photographer should take all of the photographs from the same observation point.7
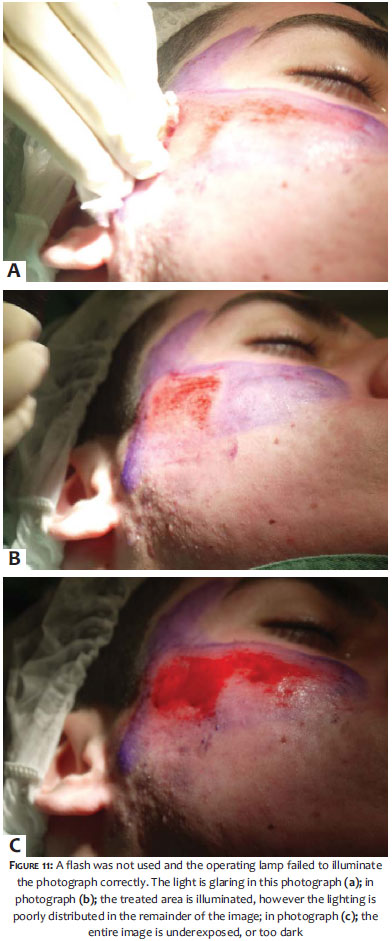
Ambient lighting is generally irregular, and may be natural (from a window) or artificial (such as ceiling or wall lighting, or flash). When photographing a patient under ceiling lighting, for example, the formation of well-marked shadows under the eyes, nose, and chin can be observed, lending a bizarre appearance to the patient. Flashes are used to correct ambient light. The light emitted by a flash has a very short duration (in the range of 1/1,000 to 1/50,000 of a second). All flashes come with a guide number (GN), which indicates their power: the greater the GN, the more powerful the emitted light. If the distance from the patient is doubled, the illuminated area is quadrupled and the light that reaches the patient becomes less intense-meaning that the farther the flash, the less the patient is illuminated. Flashes operate in manual, automatic (a sensor measures the light reflected from the object and controls the duration and intensity of the emitted light) or dedicated (the sensor measures the light from the flash that is entering through the lens-TTL, through the lens) modes.
Compact and semi-professional DSLR (digital singlelens reflex) cameras have built-in flashes, which have low power and are difficult control.8 Some semi-professional cameras and professional DSLR cameras have fittings for external flashes that work in sync with the camera, like studio flashes.
Some details must be taken into account when using flashes:
The ISO should preferably be set at 100. If it is greater than 100, sensitivities to light will be increased. In such a case, the power of the flash must de decreased.
In environments with white walls and ceiling, the light of the flash will be reflected and bounced, making the image brighter. In order to prevent this, the aperture must be adjusted (decreased)-i.e. its number must be increased.
Here is a tip to help soften the light of a flash: place a piece of white bond paper or tracing paper over the front of the light, fixed with an elastic band or adhesive tape. Also, accessories such as diffusers and reflectors built for external flashes are available in specialty stores.
In low-light environments, the patient's pupils will be dilated, reflecting the light of the flash, and turning the eyes red. One way to avoid this red-eye effect is to ask the patient to keep his or her eyes closed, opening them only at the physician's direction, just in time for the picture to be taken.
In order to avoid excessively harsh shadows (welldefined), diffusers and reflectors can be used to redirect the light to darker areas.
The removal of skin oils is crucial to avoid the reflection of the flash on the patient's face.
During surgery, the light of the operating lamp can reflect off of metallic surgical instruments, creating a glare effect (excessive brightness in the photograph that prevents the perception of details in the lesion/surgery) (Figure 11). Turning off the operating lamp and taking the photograph with a flash enhances the image.
When using an external flash, it is important not to get too close to the patient, so that the image is not overexposed (too bright).
It is important to avoid having one side of the photographed area appear brighter than the other. This can happen when the light source is positioned only on one side of the patient.
It is always recommended that you take more than one photograph of each area, as one might come out blurry.
While there are an almost infinite number of details to consider in medical photography, with some combination of training, planning and organization, it is possible to save time and reach the ultimate goal of getting a high quality photograph.
The choice of the photographic equipment is of paramount importance. Up until a few years ago, analog photography was predominant, however in recent decades there has been a revolution in the photographic market, with the emergence of digital photography. The variety of cameras that can be found today is amazing, with an availability of all sorts of equipment, from the cheapest and simplest, to the most expensive and sophisticated. Technologies continue to advance rapidly, with the development of cameras and lenses that allow increasingly better reproduction of images.
The least a dermatologist will need if he or she is to enter the world of photography is: a camera, an external flash, a memory card, a card reader, a computer with a good definition screen, good photo editing software, and a back-up system for storing images.9
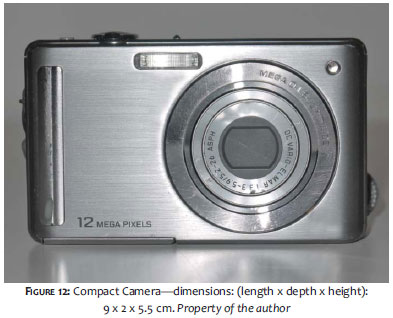
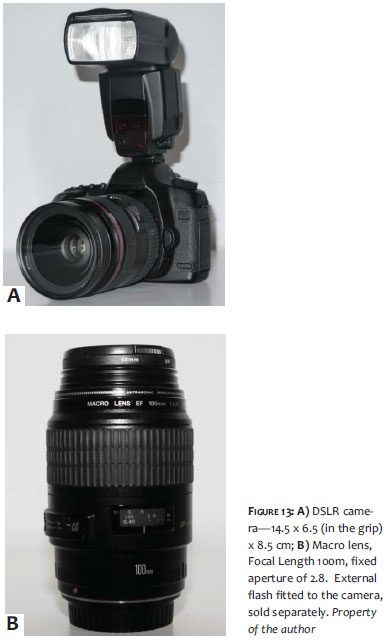
The choice of the camera depends on individual needs and how much one is willing to spend. If the predominant factor is cost, a compact camera is the best choice. If image quality is more important and the budget allows, a DSLR camera is preferable: with these cameras, sensors are larger than those in compact models, and therefore the quality of images is superior. Once the camera is chosen, other items, such as the type of lenses available, the presence of a built-in flash, an optical zoom option, the ability to preview images on the LCD (liquid crystal display)-which is important, despite its high battery consumption rate-should be taken into account.10
Compact cameras have very small sensors, are cheaper and lighter, and thus are easy to carry in any situation (Figure 12). They do not allow a change of lenses, however most have optical zoom and a navigation menu with manual adjustments so they are still worth opting for. These cameras are generally subject to shutter lag, which is a delay between the instant the button (shutter release) is pressed and the moment when the photograph is shot.11 In order to prevent this from happening (and missing the desired moment for the photograph), the photographer should press the shutter release half way so that the camera focuses on the subject, and only then engage the shutter release all the way. The built-in flash makes it harder to control the shooting action. The macro function of this camera type (usually the "little flower" icon) does not allow true macro photography for it distorts the borders of the image.
DSLR cameras-or simply reflex cameras-are more expensive and heavy bodied, however they offer advantages like the ability to changes lenses, including the use of a macro lens (Figure 13). They are faster and more complex, with more variable parameters. They also allow the connection of an external flash, which offers better lighting, due to its power being greater than that of a built-in flash. There are often accessories, such as mini-diffusers and reflectors that help to soften the light from flashes.
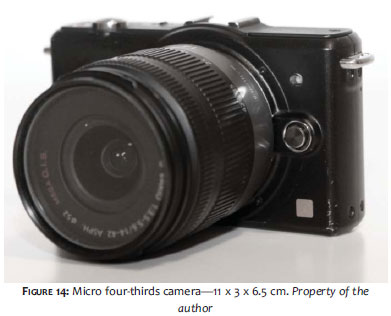
A new technology has arisen in recent years that combines the practicality of compact cameras with a larger sensor size (an intermediate level between the compact and the DSLR cameras): these cameras are called micro four thirds (micro 4/3) and do not have a set of mirrors (mirrorless). Moreover, they allow for the changing of lenses; offering more options and better image quality than compact cameras (Figure 14). Their price is also mid-range.
There are numerous websites on the Internet that assist consumers with useful tips and comparisons of different cameras. In any case, it is always good to bear in mind that the camera is only a tool, and that it is possible to obtain good photographs-even with simpler cameras-once the photographer masters the technique. A little creativity to solve problems that arise, and reading the camera's instruction manual can also be of help.
1. Ratner D, Thomas CO, Bickers D. The uses of digital photography in dermatology. J Am Acad Dermatol. 1999;41(5 pt 1):749-56.
2. Shah AR, Dayan SH, Hamilton GS 3rd. Pitfalls of photography for facial resurfacing and rejuvenation procedures. Facial Plast Surg. 2005;21(2):154-61.
3. Jakowenko J. Clinical Photography. J Telemed Telecare. 2009;15(1):7-22.
4. Persichetti P, Simone P, Langella M, Marangi GF, Carusi C. Digital Photography in Plastic Surgery: how to achieve reasonable Standardization outside a Photographic Studio. Aesthet Plast Surg. 2007;31(2):194-200.
5. Witmer WK, Lebovitz PJ. Clinical photography in the dermatology practice. Semin Cutan Med Surg. 2012;31(3):191-99.
6. Papier A, Peres MR, Bobrow M, Bhatia A. The digital imaging system and dermatology. Int J Dermatol. 2000;39(8):561-75.
7. Garça-Rabasco A. Intraoperative Photography for Dermatologic and Plastic Surgery. Dermatol Surg. 2011;37(3):404-6.
8. Nayler JR. Clinical Photography: a guide for the clinician. J Postgrad Med. 2003 49(3):256-62.
9. Mutalik S. Digital Clinical Photography: Pratical Tips. J Cutan Aesth Surg. 2010.3(1):48-51.
10. Chilukuri S, Bhatia A. Pratical digital photography in the dermatoloic office. Semin Cutan Med Surg. 2008;27(1):83-5.
11. Niamtu J. Image is everything: pearls and pitfalls of digital phtography and PowerPoint presentations for the cosmetic surgeon. Dermatol Surg. 2004;30(1):81-91.
 All content the journal, except where identified, under the Creative Commons Attribution 4.0 International licence - ISSN-e 1984-8773


 Read in Portuguese
 Portuguese PDF
 Print
Print
 Send this article by email
 How to cite this article
 Submit a comment
 Mendeley
 Pocket