


Maria Valéria Bussamara Pinheiro1
Keywords: PHOTOGRAPHY, DERMATOLOGY, FACE, SURGICAL PROCEDURES
Dermatology is a purely visual specialty.1 For the dermatologist, the possibility of seeing a cutaneous lesion is as valuable as reading about it. In this fact lies the importance of photography for this medical specialty.2 The first medical imaging was performed in France in 1845, using a daguerreotype (a camera prototype in the early history of photography, invented by Louis Daguerre). Medical photography itself emerged almost 150 years later and has been constantly improving since then, following technological advances in the wider field of photography.
For decades, photography was accepted as an efficient way of documenting dermatological conditions,3 having become a fundamental tool in the daily practice. Nowadays, it can be said that the act of photographing has become routine for the dermatologist, who can be called a functional photographer 4, since taking pictures is necessary for exercising this profession. Photography is necessary for the follow-up records of lesions, and as an auxiliary tool for choosing the best treatment, for it clearly shows outcomes (before and after pictures of cosmetic procedures and surgeries); for the education of physicians (lectures and training of resident physicians); for supporting and illustrating clinical research and publications; as a modality of legal documentation; and finally as the basis of teledermatology, a field that has been developed in recent years.
Since the introduction of digital technology in 1981, photography has had a steady development. The cost of digital cameras is decreasing as the technology advances, and the great diversity of models found in the market allows easy access to good quality equipment at low cost.
Nonetheless, there is still room for improvement, since most of the medical pictures are disappointing:5 they are excessively bright or dark, have color distortions, blurry images, and it is difficult to serially compare a set of images. Medical photography is characterized by the accurate and reliable description of all alterations observed. Medical images are different from snapshots,6 those pictures that are taken at random, without any care or attention to detail and which include elements that pollute the image and distract the viewer.
In order to get better quality photographs, some aspects such as the choice of proper equipment, the proper execution of photographic technique, and the standardization of photographs must be taken into account.
Faced with the diverse range of camera models, brands, and prices currently available, the choice of equipment should be based on the intended photographic subjects and the available budget. Whatever the choice, it is important to bear in mind that the camera is only a means, and that with basic knowledge of the photographic technique, anyone can obtain great photographs. Before buying a camera, it is worth considering that there are hundreds of models on the market-from the simplest to most sophisticated professional models.
Most compact models are of the point-and-shoot variety, meaning that once it is turned on, the camera is ready to take pictures. The more elaborate models have semiautomatic menus, enabling their use in different conditions (portrait, landscape, night, close-up, manual mode, etc), though it is not possible to change lenses, therefore limiting their use. Despite this, they are lighter, cheaper, and simpler to handle. There are brands with good quality lenses, such as Zeiss or Leica, and others with acrylic lenses, which compromise the quality of images.
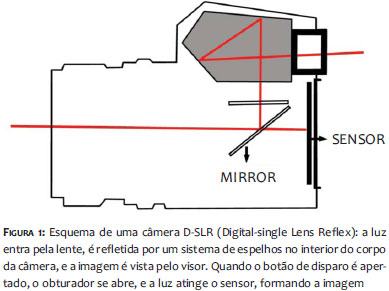
The D-SLR or Digital Single-Lens Reflex (Figure 1) are deemed to be professional and semi-professional cameras, which allow the changing of lenses, and broadening the spectrum of use.7 They are bigger and noisier, and more expensive and difficult to use.
More recently, compact cameras have arisen that allow the user to change the lenses, making up an intermediate category, as they are not as expensive as the professional models and have technology similar to that of the compact models.
Whichever model is chosen, reading the manual is highly recommended for getting the full potential out of the camera.
The photographic technique involves several complementary factors to produce a good photograph. The most significant are the aperture, the shutter speed and the ISO, which comprise the "photographic triangle". In addition to these factors, the focal length, the angle of coverage, the white balance (which is related to the color temperature) and other concepts such as macro photography and zoom must be observed.8,9
Aperture
The camera's diaphragm is formed by a set of blades arranged circumferentially in the body of the lens. Its movement increases or decreases the size of the opening through which the light passes. The diaphragm corresponds to the iris of the eye, meaning that the smaller the opening, the less light passes through the orifice, enabling the control of the amount of light that reaches the sensor. It is represented by a variable called an f-stop (or just f) in a scale in which the smaller numbers corresponds to larger apertures10 (Table 1).
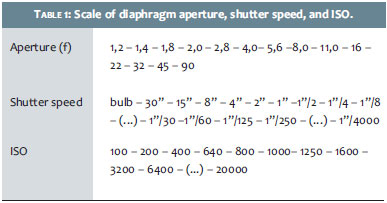
Another crucial effect of the diaphragm is related to the focus (or sharpness) of the image. The portion of the image that appears focused and sharp in the photograph is called the depth of field (DOF). Since the light is always projected in a straight path, every ray of light should only reach a single point in the sensor in order for the object to be in focus. When the diaphragm is set at a large aperture, the light rays are allowed to enter the lens from several different directions, striking the sensor at different points and in a disorganized way; only the rays that reach the sensor perpendicularly stay focused. In practice, an observer will see a photograph whose center is sharp but with a blurred background. If set at a small aperture, the rays are better "organized" and most of the image is in focus. In the diaphragm's scale, the lower the number f, the larger the DOF. When photographing a patient's face before a particular procedure, it is important that the entire face appears clearly in the image, including its outline. To attain this, a lower DOF is insufficient, meaning that the value of f cannot be low-as a lower value indicates a greater amount of light passing through the lens (Figure 2).
Shutter speed
The shutter corresponds to the "eyelid", and its movement is similar to that of the blink of an eye. The shutter speed is related to the perception of movement in a photograph, but also has the function of adjusting the amount of light that will reach the sensor. It consists of one or two blades-whose location depends on the camera type-that can be opened and closed at different speeds, given in seconds or fractions of seconds11 (Table 1). During the time it remains open, light passes through, determining the amount of movement in the picture. The longer the time it remains open, the more light passes through the shutter, recording a greater amount of movement, which may cause a "blurred" image. Shorter opening times record a smaller amount of, or no movements at all (frozen). A classic example is that of photographs of waterfalls: in an image where the water appears as a veil, the shutter remained open for a long time (less speed, closing slowly) and the water appeared "blurred". If the shutter remained open for a short time (higher speed, closing quickly), the image of water would have appeared "frozen".
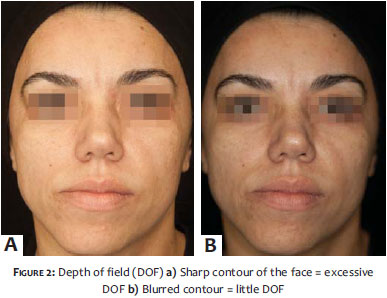
The time interval during which the sensor is exposed to light is called exposure (Figure 3). A long exposure time allows the sensor to be reached by a greater amount of light, resulting in a brighter or overexposed image. On the other hand, a short exposure time produces a darker or underexposed image.
ISO
The ISO determines the sensor's sensitivity to the light, and can be adjusted according to the ambient light. Its values are also presented according to a scale (Table 1). The ISO (International Standard Organization) is equivalent to the ASA (American Standards Association, nowadays ANSI), which measures a film's speed. The ISO should ideally be set at 100. Excessive increases in the ISO also entails a loss in image quality, causing them to become grainy.
The aperture, the shutter speed and the ISO work together, mutually offsetting each other, thus determining the photometry, which is a measure of the amount of light that reaches the sensor. With the ISO set at the basic value (100), the aperture and shutter speed automatically adjust in an inversely proportional ratio, aimed at maintaining the correct exposure.
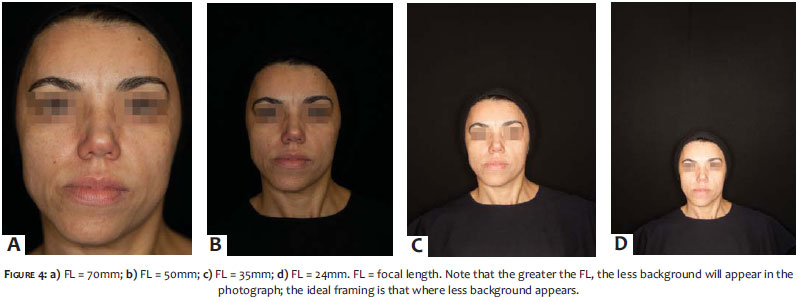
Focal length (FL)
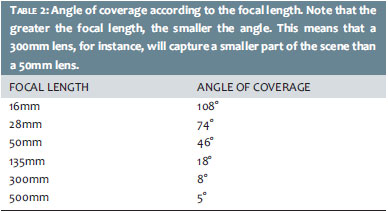
The measure of focal length (FL) is marked on the body of the lens, serving to identify its power. For instance, a 300mm lens is six times more potent than a 50mm lens, meaning it has six times more magnification power (Figure 4). Each lens has an angle of coverage, which is the angle range through which the lens captures the image (Table 2). According to the angle of coverage, lenses are classified into wide-angle, normal, and telephoto. It is important to note that the higher the FL, the smaller the angle range and thus the image formed. A 50-55mm lens is quite interesting for dermatologists for its angle of coverage is similar to that of the human eye. With such a lens, it is possible to photograph a range that includes a patient's entire body to various individual parts of his/her body, barringdetail photos. For that a macro lens is necessary.
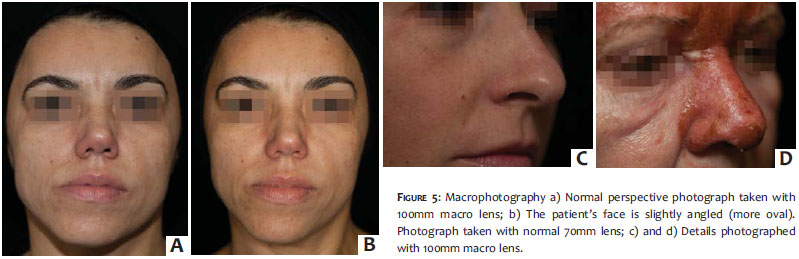
Macrophotography
Macrophotography reproduces the full size image on the camera's sensor (1:1). Macro lenses are specific and designed to take pictures at close range without distorting the image, i. e. with normal perspective (Figure 5). Macrophotography must be distinguished from the "macro function" (universally represented by the symbol of a flower on compact cameras), which takes pictures at close range (between two and 5cm), but with distortion of the image, causing rounded and blurred edges and angulated faces. The specification "macro" is written on the body of the lens, which can have a variable FL.
Zoom
Zooming in is a way of getting closer to the photographed subject without the necessity for the observer to move their position. The zoom function can be of two types: optical or digital. In optical zoom, the lens extends physically (altering the FL) in order to magnify the subject without changing the image quality. The digital zoom "cuts off" the area surrounding the subject, therefore keeping a smaller size image, which is then increased to fit in the frame-this phenomenon is called interpolation and entails loss of image quality.
When choosing a camera for purchase, it is important to make sure it has optical zoom.
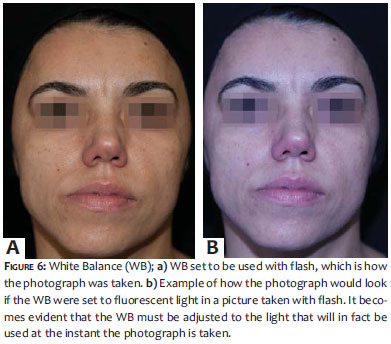
White balance (WB)
Different light sources also render different colors. Images usually become greenish under fluorescent light, while incandescent sources render orange tones. The naked eye is able to differentiate colors and recognize white. Cameras, however, have to be "taught" to differentiate and recognize colors, setting a basic parameter from which it will carry out the actual reading and recording of the colors present in the image. Cameras have menus with WB settings for specific situations (flash, sunlight, shade, fluorescent light, incandescent light, etc), including the automatic mode (Figure 6).
Light has a fundamental role in the image, which should accurately describe the color and contours of the skin. It is of paramount importance to take into consideration the source of light in the environment in which the photographs are taken.
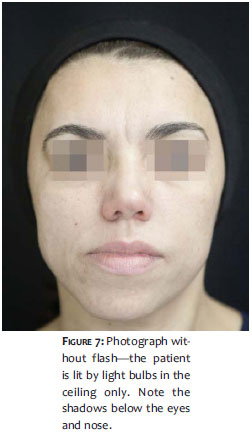
In medical photography, the image must not appear too dark or too bright, for that would hamper the observation of point in time alterations. In daily practice there are usually two types of light sources: natural (from windows) or artificial (ceiling lighting, desk and/or floor lamps). The light from windows determines a very heterogeneous lighting, given that around noon light is more bluish and at the beginning and end of the day, it is more orange. On the other hand, artificial light produces unusual shadows below the eyes, nose, and chin, and less light causes alterations in the exposure and reduces the appearance of wrinkles. Tungsten-based and fluorescent sources of light cause color discrepancies (Figure 7). It is considerably difficult to reproduce photographs in a consistent manner; the use of a flash must be considered in order to correct the ambient light. The flash can be built into the camera or externally attached to the equipment. It generally works well in automatic mode, however can also be manually adjusted. In order to avoid shine on the skin (in addition to previous degreasing), a white bond paper or tracing paper should be put in front of the flash, or specific diffusers should be used to cause the light of flash to become softer.
In addition, there are numerous accessories, including reflectors, which help redirect light, thus improving the quality of lighting. A single flash positioned frontally or very close to the patient can excessively illuminate an area and "hide" wrinkles or important details of the image. Ideally, two flashes positioned diagonally to the patient should be used. Another option is the ring flash (rounded flash positioned around the lens), which, however, can cause a "flattened" aspect to the image for it does not allow the correct visualization of textures and reliefs. In environments with white walls and ceilings, the light is reflected, lending a brighter aspect to the image. This can be avoided by decreasing the aperture and preventing excessive penetration of light. Conversely, in darker environments the patients' pupils will be dilated, reflecting the light of the flash and making the eyes appear red. Some cameras come with "red-eye reducer" options for mitigating this effect. However, a simple way to overcome this issue is to ask the patient to keep his or her eyes closed until the photograph is about to be taken, only opening them at that time of the shooting. Currently, there are sources of continuous light that provide softer lighting than that of flash systems.
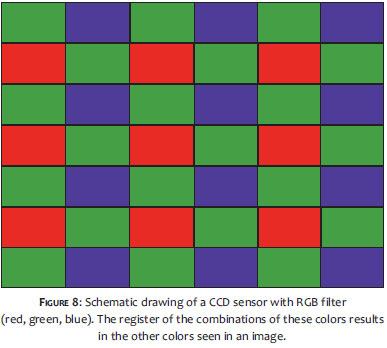
The light entering the lens is captured by an electronic sensor to form a digital image. These sensors can be of two types: 12 CCD (coupled-charged device) or CMOS (complementary metal-oxide semiconductor), and consist of millions of photosensitive elements, pixels (from "picture elements") and a silicone chip. The pixel is the smallest element of a digital image, and the amount of pixels is directly related to the resolution: the greater the amount of pixels, the higher the resolution of an image, meaning it has more detail and better quality. A camera of three to six megapixels (MP) is sufficient for use in dermatology (Figure 8).
File Formats
Each image formed by the sensor generates a file, whose size is directly proportional to the number of pixels, meaning that the greater the amount of the latter, the more memory space it will occupy.13 Most cameras use three types of files: JPEG (Joint Photographic File Format), an international standard which compresses the image and makesit much smaller, so that it takes up less memory space without significant loss of resolution; TIFF (Tagged Image File Format), the industry standard, is larger than the JPEG format; RAW, which is used in DSLR cameras and is a minimally processed image that does not suffer compression and therefore there is no loss of quality. By default, images are saved at 72dpi (dots per inch), however an image editor is able to convert it to 300dpi, which is a more appropriate format for printing.
Storage
Ideally, downloading of medical images from the camera to storage devices should be carried out at least twice a week in order to avoid the risk of losing them.14 Memory cards can be erased and re-used. Images downloaded to computers should be classified by patient-with names and dates specified-and stored in folders. For safety, the back up of these images should be carried out regularly. Pen drives, CDs, DVDs, and HDDs are examples of solutions for backing up image files.
Once in possession of the most adequate equipment, and after careful observation of the photographic technique and correct aspects of ambient lighting have been carried out, a good quality photograph can be achieved with a few more steps.15 The last-but not least-item to be added to the photographic routine, is the standardization of the images, which lends credibility to the cosmetic or surgical treatment.
In order to obtain photographs that are comparable with each other, the only variable in the pictures should be the patient. Everything else should remain constant: viewpoint, lighting, position, color, contrast, perspective, background, distance between the camera and the patient. These principles should be applied to any series of two or more images of the same patient, and require planning and attention to detail.
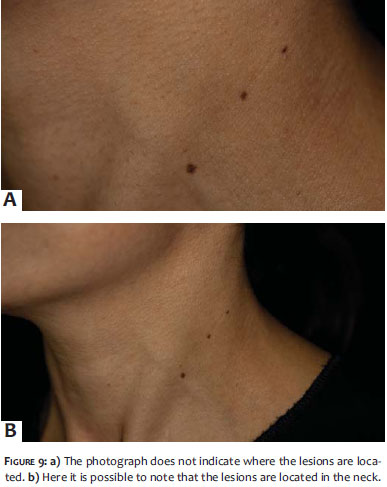
It is important to establish a photographic routine, which begins with the patient's signing of the Term of Consent. The patient must be clearly identified in the picture, however in a careful way so that the identification does not overwhelm the subject of the photograph. A good identification method is to affix a small dated label with the patient's initials in an area that does not contain a lesion or a clinical change intended to be highlighted in the photograph. Also, the patient's data can be photographed in the first picture of the sequence. In photographs of details, parts of the body can become unrecognizable, making it important to record some reference to it in the photographs (Figure 9).
Lighting should be exactly the same in before-and-after photographs. The background must have a solid and neutral color, such as black, white, or gray. Always bear in mind that some colors may be reflected in a patient's skin. Any factor drawing the observer's attention away from the main subject must be eliminated. This includes articles of clothing, makeup and accessories, and hair, which must be secured with a band of neutral color or with a cap. The camera must be positioned at the same angle with respect to the patient, and the same lens must be used in all photographs. The patient should be comfortable and maintain a neutral facial expression, for any small muscle movement can accentuate or soften wrinkles and/or stains.
On legal terms, the original digital image is the one that has been recorded on the memory card. Therefore it is important to take photographs using RAW format, which corresponds to the film'snegative.16 In the digital age, the ease of manipulation of images has led to a growing concern about the reliability of the photographs and the preservation of the patient's confidentiality. Therefore it is crucial that the patient signs a Term of Consent authorizing the use of the photographs, in order to prevent their misuse. In addition, the use of software that alters the appearance of real images must be avoided.17,18
It is also worth noting that patients may feel intimidated by having to undress to be photographed. Therefore everything possible must be done to make the situation less awkward, including the explanation of objectives and goals of each photograph.
1. Lunnon RJ. Basic medical photography for the dermatologist. Br J Dermatol. 1970;83(4):493-4.
2. Papier A, Peres MR, Bobrow M, Bhatia A. The digital imaging system and dermatology. Int J Dermatol. 2000;39(8):561-75.
3. Witmer WK, Lebovitz PJ. Clinical photography in the dermatology practice. Semin Cutan Med Surg. 2012;31(3):191-9.
4. Kallyadan F, venkitakrishnan S, Dharmaratnan AD. Basic digital photography in dermatology. Indian J Dermatol Venereol Leprol. 2008;74(5):532-6.
5. Nayler JR. Clinical Photography: a guide for the clinician. J Postgrad Med. 2003;49(3):256-62.
6. Slue WE, Paglialunga A, Neville J, Stiller MJ. Snapshots versus medical photographs: understanding the difference is your key to better dermatologic office photography. Cutis. 1993;51(5):345-7.
7. Ratner D, Thomas CO, Bickers D. The uses of digital photography in dermatology. J Am Acad Dermatol. 1999;41(5 pt 1):749-56.
8. Persichetti P, Simone P, Langella M, Marangi GF, Carusi C. Digital Photography in Plastic Surgery: how to achieve reasonable Standardization outside a Photographic Studio. Aesthet Plast Surg. 2007;31(2):194-200.
9. Kaliyadan F, Manoj J, Venkitakrishnan S, Dharmaratnam AD. Basic digital photography in dermatology. Indian J Dermatol Venereol Leprol. 2008;74(5):532-6.
10. Langford M, Fox A, Smith RS. Langford's basic photography: the guide for serious photographers. 9th ed. Oxford UK: Elsevier; 2010.
11. Ramalho JA, Palacin V. Escola de fotografia. 4 ed. São Paulo: Saraiva; 2010.
12. Shah AR, Dayan SH, Hamilton GS 3rd. Pitfalls of photography for facial resurfacing and rejuvenation procedures. Facial Plast Surg. 2005;21(2):154-61.
13. Hubbard VG, Goddard DJ, Walker SL. An online survey of the use of digital câmeras by members of the British Association of Dermatologists. Clin Exp Dermatol. 2009;34(4):492-4.
14. Chilukuri S, Bhatia A. Pratical digital photography in the dermatoloic office. Semin Cutan Med Surg. 2008;27(1):83-5.
15. Niamtu J. Image is everything: pearls and pitfalls of digital phtography and PowerPoint presentations for the cosmetic surgeon. Dermatol Surg. 2004. 30(1):81-91.
16. Scheinfeld N. Photographic Images, Digital Imaging, Dermatology and the Law. Arch Dermatol. 2004;140(4):473-6.
17. Goldberg DJ. Digital Photography, Confidentiality, and Teledermatology. Arch Dermatol. 2004;140(4):477-8.
18. Lakdawala N, Fontanella D, Grant-Kels JM. Ethical considerations in dermatologic photography. Clin Dermatol. 2012;30(5):486-91.
 All content the journal, except where identified, under the Creative Commons Attribution 4.0 International licence - ISSN-e 1984-8773


 Read in Portuguese
 Portuguese PDF
 Print
Print
 Send this article by email
 How to cite this article
 Submit a comment
 Mendeley
 Pocket